Showing posts with label ubuntu. Show all posts
Showing posts with label ubuntu. Show all posts
Thursday, July 13, 2017
Display File Content with Colors and Line Number Alternative to cat Ubuntu
Display File Content with Colors and Line Number Alternative to cat Ubuntu
Sometimes you may want to quickly display the contents of a file directly on the command line with the `cat` command. And sometimes the contents of that file is the source code of a program.
If you want to display the source code markup with colors and line numbers, then this trick is what you are looking for.
What you need to do first is install Pygments, a python syntax highlighter.
sudo apt-get install python-pygments python3-pygmentsAfter installing pygments, you can now view source code with colored markups. just run the ff:
pygmentize testfile.rbNow for the line numbers, you will have to pipe the `nl` command
pygmentize testfile.rb | nl --body-numbering=aThe option
--body-numberingmeans it will accept a style for line numbering and it is any of the ff:
a - number all lines
t - number only nonempty lines
n - number no lines
I used a so that everything will be numbered including empty lines.
We can actually add nl options in bash alias so that we do not have to type it everytime.
alias nl=nl --body-number=aWhile at it, lets also shorten the pygmentize command.
alias ccat=pygmentizeNow the source code syntax will be highlighted everytime we ran this command:
ccat testfile.rb | nl

Friday, July 7, 2017
Thursday, July 6, 2017
Disable touchpad in Ubuntu 11 04 Natty Narwhal
Disable touchpad in Ubuntu 11 04 Natty Narwhal
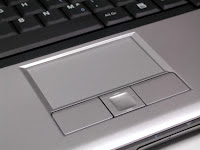
One of the most irritating things I have experienced in Ubuntu 11.04 was the inability to disable touchpad. Though my laptop has a hardware button to toggle touchpad, it never worked in Ubuntu. When I was typing something, in most occasions an accidental touch of the touchpad caused the cursor to move somewhere else and part of the typed text ended up in nowhere.
But later I found this amazing little program called touchpad-indicator which can REALLY toggle touchpad status in Ubuntu. To install it use the following commands on terminal.
sudo add-apt-repository ppa:atareao/atareao
sudo apt-get update
sudo apt-get install touchpad-indicator |
| figure 1 |
 |
| figure 2 |
Hope this will be helpful !
Wednesday, June 14, 2017
Difference between adduser and useradd in Ubuntu server
Difference between adduser and useradd in Ubuntu server
Difference between adduser and useradd in Ubuntu-server
Both the command are used to add user in the system. But there is a big difference.
Nowadays debian has changed or replaced the useradd command with adduser.
The difference between both command is as following with the image so that will make clear sense to you people.
To check the difference between both the command do the following.
1. useradd
Open the terminal and type
$ sudo useradd user2
The above command will add the user

$ sudo passwd user2
The above command will give the password to the user2.

Now lets try loging in.
login: user2
password:123
 As you can there is no home directory is defined.And not able to create its own directory with "useradd" command.
You can also check the directory and the command assigned to it

==========================================================================
2. adduser
Open the terminal and type :-
$ sudo adduser user3
 The adduser command takes all the information and create your personal home directory for saving your data and gives uid and gid with that.

You can see the home directory assigned to user3 by this command.
$ cat /etc/passwd | grep user3

From this tutorial you can might have understand the difference between both the command and how you can add the other or extra user in the system.
Both the command are used to add user in the system. But there is a big difference.
Nowadays debian has changed or replaced the useradd command with adduser.
The difference between both command is as following with the image so that will make clear sense to you people.
To check the difference between both the command do the following.
1. useradd
Open the terminal and type
$ sudo useradd user2
The above command will add the user
$ sudo passwd user2
The above command will give the password to the user2.
Now lets try loging in.
login: user2
password:123
As you can there is no home directory is defined.And not able to create its own directory with "useradd" command.You can also check the directory and the command assigned to it
==========================================================================
2. adduser
Open the terminal and type :-
$ sudo adduser user3
You can see the home directory assigned to user3 by this command.
$ cat /etc/passwd | grep user3
From this tutorial you can might have understand the difference between both the command and how you can add the other or extra user in the system.
Monday, June 12, 2017
Disabling splash screen in ubuntu 9 10
Disabling splash screen in ubuntu 9 10
The splash screen is shown when you boot up ubuntu. You can stop showing it and display lot of details about your boot process as below.
Run gedit in su mode and edit the file /etc/default/grub
Locate the line that shows the floolwingsudo gedit /etc/default/grub
After the previous command is finished you should be able to reboot and when you boot up you will have a verbose boot with out a splash screen. You can experiment with "splash" alone removed from the config file.Remove quiet and splashGRUB_CMDLINE_LINUX_DEFAULT="quiet splash"Then save and close out of your editorGRUB_CMDLINE_LINUX_DEFAULT=""
Run the following command to update grub.
Code:This may take a couple of minutes with out any visible feedback. You will come back to bash prompt eventually.sudo update-grub
Sunday, June 11, 2017
Disable Overlay Scrollbars in Ubuntu Precise
Disable Overlay Scrollbars in Ubuntu Precise
For me, it is worth having the Ubuntu Overlay Scrollbars enabled on my Precise system due to all the hard work that was done on this project. Overlay Scrollbars have quite evolved since Natty, and in Precise, I am quite satisfied with the performance of these scrollbars, which now feature an extended proximity area, and thus, are far more easily accessible than how it used to be in Natty.

Still, if you don't like these new scrollbars, you can try reverting to the traditional old-style ones. But remember, in Precise, the scrollbar arrows which you would expect to show up at the top and the bottom of the scrollbar won't be available, same as with Oneiric before.

For disabling Overlay Scrollbars in Ubuntu Precise, get to a Terminal and run:
Continue Reading �Still, if you don't like these new scrollbars, you can try reverting to the traditional old-style ones. But remember, in Precise, the scrollbar arrows which you would expect to show up at the top and the bottom of the scrollbar won't be available, same as with Oneiric before.
For disabling Overlay Scrollbars in Ubuntu Precise, get to a Terminal and run:
Saturday, June 10, 2017
Disable Apport Error Report Dialog in Ubuntu 12 04
Disable Apport Error Report Dialog in Ubuntu 12 04
In fresh Ubuntu 12.04 installation, it keeps popping up annoying apport error report dialog on every log-in even after sending the error report. This simple tutorial will show you how to disable this dialog in Ubuntu.

Open up terminal from the dash home or press Ctrl+Alt+T, edit �/etc/default/apport� file with this command:
sudo gedit /etc/default/apport
Set enable=0:
enable=0
Save the file, and done!
Thursday, June 8, 2017
Disable IPv6 on Ubuntu
Disable IPv6 on Ubuntu
Edit your /etc/sysctl.conf file and add the following to the bottom:
#disable ipv6Or you can use the following script:
net.ipv6.conf.all.disable_ipv6 = 1
net.ipv6.conf.default.disable_ipv6 = 1
net.ipv6.conf.lo.disable_ipv6 = 1
echo "#disable ipv6" | sudo tee -a /etc/sysctl.confFor this changes to take effect you must reboot your system.
echo "net.ipv6.conf.all.disable_ipv6 = 1" | sudo tee -a /etc/sysctl.conf
echo "net.ipv6.conf.default.disable_ipv6 = 1" | sudo tee -a /etc/sysctl.conf
echo "net.ipv6.conf.lo.disable_ipv6 = 1" | sudo tee -a /etc/sysctl.conf
After rebooting you can check if IPv6 has been disabled with the following command:
cat /proc/sys/net/ipv6/conf/all/disable_ipv60 means its enabled and 1 - disabled.
Saturday, June 3, 2017
Digikam 5 4 0 is Released and Available PPA For Ubuntu 16 04 Ubuntu 16 10
Digikam 5 4 0 is Released and Available PPA For Ubuntu 16 04 Ubuntu 16 10

digiKam is an open source project that provides users with a dedicated photo management solution, specifically designed to be deployed on KDE desktop environments. It includes image editor and organizer components, which can be easily extended through a built-in and powerful plugin architecture.
Features at a glance
Key features include red eyes correction, brightness, contrast, gamma, hue, saturation and luminosity correction, color balance, color inversion, color auto-correction, ratio cropping, free cropping, black & white and tonality converter using curves adjustments, rotation, and flipping.
With this tool, you will be able to import pictures, organize your photo collection, view images, edit and enhance photos, create slideshows and calendars, print and share your photo creations using social web services, email images, and much more.
Read more the ReleaseAnnounce
How to Install Digikam 5.4.0 on Ubuntu Derivative System :
To Install/Update Digikam 5.4.0 on Ubuntu 16.10 Yakkety Yak, Ubuntu 16.04 Xenial Xerus, Ubuntu 15.10 wily werewolf, Ubuntu 15.04 vivid Vervet, ubuntu 14.10 Utopic Unicorn, Ubuntu 14.04 Trusty Tahr (LTS), Ubuntu 13.10/13.04/12.04, Linux Mint 18.1, Linux Mint 18 Sarah, Linux Mint 17.1 Rebecca, Linux Mint 17 Qiana, Linux Mint 13 Maya, Pinguy OS 14.04, Elementary OS 0.3 Freya, Elementary OS 0.2 Luna, Peppermint Five, Deepin 2014, LXLE 14.04, Linux Lite 2.0, Linux Lite 2.2 and other Ubuntu derivative systems, open a new Terminal window and bash (get it?) in the following commands:You can update your system with unsupported packages from this untrusted PPA by adding ppa:philip5/extra to your systems Software Sources
sudo add-apt-repository ppa:philip5/extra
Like this :

Update repository and install digikam package :
sudo apt-get update
sudo apt-get install digikam5
to remove digikam, do :
sudo apt-get remove digikam
Wednesday, May 31, 2017
Disable rate limiting in rsyslog v5 Linux RHEL CentOS Ubuntu
Disable rate limiting in rsyslog v5 Linux RHEL CentOS Ubuntu
Hello,
This article will show you how to disable rsyslog rate-limiting, But You can also use rate-limiting according to your requirement.?

This article will show you how to disable rsyslog rate-limiting, But You can also use rate-limiting according to your requirement.?
Read more: http://www.tejasbarot.com/2015/09/17/disable-rate-limiting-in-rsyslog-v5-linux-rhel-centos-ubuntu/
Saturday, May 27, 2017
Disable Directory Listing in Apache on Ubuntu 14 04 but should work in other versions as well
Disable Directory Listing in Apache on Ubuntu 14 04 but should work in other versions as well
If you are a newbie to setting up a web server on Ubuntu by yourself, you might have encountered this as I do:

This is called Directory Listing in Apache server settings. And this is turned on by default.
To check if you have this problem, try to visit a directory in your apache server location with a browser, such as : localhost/someFolder
If you see something similar to the above photo, you got this problem as well.
While it might not be a huge security problem to your site, it certainly makes you not comfortable, and it is also not a very pleasant experience for users to crash into your directory like this.
However, it is actually very easy to turn it off in Ubuntu, here is how.
1. Open Nautilus (Ubuntus default file explorer,) as root in terminal using this command:
sudo nautilus
2. Then, navigate to /etc/apache2
3. From there, you will find a file named :
apache2.conf
4. Open apache2.conf with your favorite text editor.
5. Find this line: ( there are actually two lines of these, ones under <Directory /var/www/>, and another one is under <Directory /srv/>, for now, we will work on the former one since thats where our website is in.)
Options Indexes FollowSymLinks
6. Remove Indexes from this line, so that it will look like this
Options FollowSymLinks
7. Save the file, open a terminal then restart apache.
sudo service apache2 restart
And we are done, try to visit a directory under your web var/www in a browser, and you will get a 403 forbidden error.
digiKam 5 1 0 released Install on Ubuntu 16 04
digiKam 5 1 0 released Install on Ubuntu 16 04
digiKam 5.1.0 just recently released, introduces a new huge bugs triage and some fixes following first feedback from end-users. This release update internal Libraw to last public and pre-release version 0.18.0.

This permits digiKam to support new lead RAW cameras as:
- Canon 80D, 1300D, 1DX MkII
- Fujifilm X-Pro2, X70, X-E2S
- HTC One A9 and M9
- Leica M and X-U
- Nikon D5
- Olympus Pen F, SH-3
- Panasonic DMC-GX80/85, DMC-TZ80/81/85/ZS60, DMC-TZ100/101/ZS100
- PhaseOne IQ150, IQ180 IR, IQ3
- Samsung Galaxy S7
- Sony ILCA-68, ILCE-6300, RX1R II, RX10 III
Additional Changes and Improvements made in this release
- A consolidation of Mysql database interface has been continued
- Some optimizations have been introduced to speed-up startup operation, especially to delay the scan from new items after the main interface initialization
- Also the option to enable or disable the scan for new items at startup is back in Setup/Miscs dialog page
Install digiKam 5.1.0 on Ubuntu 16.04 and Ubuntu 15.10
sudo apt-add-repository ppa:philip5/extra

sudo apt-get update

sudo apt-get install digikam5
How to remove digiKam 5.1.0 from Ubuntu 16.04 and Ubuntu 15.10
sudo apt remove digikam5

sudo apt autoremove
Tuesday, May 23, 2017
Ditching Ubuntu 64 bit
Ditching Ubuntu 64 bit
Since upgrading to Ubuntu 10.04 64-bit my PC became unstable. Most of the time it was just innconveinent minor things. The clock on the top panel wouldnt display properly. However occasionally the whole PC would freeze. Especially when under a heavy work load. Couple this with the fact that Adobe Flash and Adobe Air have never worked to satisfactory degree. I decided it was time to go back to a 32-bit world.
What I had to consider was what I was losing and what I was gaining. My PC has 8GB of RAM. Normally on a 32-bit system 3.75GB is as much as you get. So Id potentially be losing half of my RAM. But that was it. None of the software I use is exclusively 64-bit. Some of it is however exclusively 32-bit and there are ways around the 4GB memory cap in 32-bit operating systems.
What I stood to gain was a simpler installation procedure for my 32-bit only software and a more stable operating system. I use the 32-bit version of Ubuntu 10.04 on my laptop with no problems. So I already knew it was more stable.
To get past the 4GB memory cap, I intended to install the server kernel which has PAE technology enabled by default. However I found this was totally unnecessary. The desktop kernel in Ubuntu 10.04 comes with PAE support.
In the end up I now have a more stable PC. A simpler installation procedure for my 32-bit software. I still get to use 7.9GB of the total 8GB of RAM in my PC. Which is actually an improvement over the 64-bit version of Ubuntu. The PC does however feel a little sluggish at times. Particularly when launching applications. But thats a small price to pay for simplicity and stability.
Sunday, May 14, 2017
Disconnect a network user from the network using Tuxcut in Ubuntu Debian
Disconnect a network user from the network using Tuxcut in Ubuntu Debian

How to install tuxut in ubuntu/Debian
see This Link
Friday, May 12, 2017
Digikam 5 3 0 PPA is Available For Ubuntu 16 04 and Ubuntu 16 10 Yakkety Yak
Digikam 5 3 0 PPA is Available For Ubuntu 16 04 and Ubuntu 16 10 Yakkety Yak

DigiKam is an open source project that provides users with a dedicated photo management solution, specifically designed to be deployed on KDE desktop environments. It includes image editor and organizer components, which can be easily extended through a built-in and powerful plugin architecture.
Features at a glance
Key features include red eyes correction, brightness, contrast, gamma, hue, saturation and luminosity correction, color balance, color inversion, color auto-correction, ratio cropping, free cropping, black & white and tonality converter using curves adjustments, rotation, and flipping.
With this tool, you will be able to import pictures, organize your photo collection, view images, edit and enhance photos, create slideshows and calendars, print and share your photo creations using social web services, email images, and much more.

Changelog Since Digikam 5.2.0 :
After a 3rd release 5.2.0 published more than one month ago, the digiKam team is proud to announce the new release 5.3.0 of digiKam Software Collection. This version introduces an important common solution to deploy the application under Linux using AppImage bundle.
AppImage is an open-source project dedicated to provide a simple way to distribute portable software as compressed binary file, that standard user can run as well, without to install special dependencies. All is included into the bundle, as last Qt5 and KF5 frameworks. AppImage use Fuse file-system, which is de-compressed into a temporary directory to start the application. You dont need to install digiKam on your system to be able to use it. Better, you can use the official digiKam from your Linux distribution in parallel, and test the new version without any conflict with one used in production. This permit to quickly test a new release without to wait an official package dedicated for your Linux box. Another AppImage advantage is to be able to provide quickly a pre-release bundle to test last patches applied to source code, outside the releases plan.
The bundle include main 3rd-party libraries used by digiKam as Lensfun, OpenCV, and Exiv2. All are optimized for digiKam, and without extra or experimental configurations which can crash the application in special cases.

The simple way to use the digiKam AppImage is to download the right file for your system (32 bits or 64 bits), to make it executable, and to run it. See AppImage documentation if you need more information about.
With the continuous help of Wolfgang Scheffner, The digiKam handbook have been updated again and is available on-line at digiKam. All help are welcome to contribute on user manual, by writing sections, proof-reading, translating, etc.
For furher information, take a look into the list of more than 40 files currently closed in Bugzilla. A special thanks to Maik Qualmaan who improve code everywhere.
digiKam software collection source code tarball, Linux 32/64 bits AppImage bundles, MacOS package, and Windows 32/64 bits installers can be downloaded from this repository
Install/Update DigiKam 5.3.0 on Ubuntu via PPA
Because it is available via PPA, installing DigiKam 5.1.0 on Ubuntu 16.04 Xenial Xerus, ubuntu 16.10 yakkety Yak and derivative systems is easy. All you have to do is add the ppa to your system, update the local repository index and install the vlc package. Like this:
sudo add-apt-repository ppa:philip5/extra
sudo apt-get update
sudo apt-get install digikam5
After installation is completed, open terminal and follow this command :
sudo digikam5
See the release Announce
Tuesday, May 9, 2017
Directory structure of Ubuntu Linux
Directory structure of Ubuntu Linux
Ubuntu directory structure is a directory tree structure very much similar to directory structure of Unix. There is a resemblance between Unix directory structure and directory structure of Ubuntu Linux. The Ubuntu Linux directory structure contains the root directory / at the top with the remaining Linux system directories and file structure like hard disk, partition and other data files falling under it. It is a tree like structure and the top of the tree i.e., the highest level in the file system is the root directory /.
Some important Ubuntu Linux system directories are

1. /bin: This directory contains important binary application. It would contain the executable file for command like ls, cal, grep etc which are used in everyday Linux environment, directly or indirectly.
2. /boot: This directory contains the files needed for booting up the operating system. It include the kernel (vmlinux), ramdisk image (initrd.lz) and bootloader configuration files.
3. /dev: This Ubuntu Linux directory does not consume any space on disk and is used to keep track of devices connected to the computer including the ones which are a part of the CPU such as the disks, mouse, display,graphics card etc.
4. /etc: This is the place where you can find the configuration files of the base OS and other installed applications and startup scripts. It contain all the configuration files, ranging from the ones which control the booting of computer to the ones which can change the behavior of installed software and services.
5. /home: It is the user profile folder in Linux similar to the c:/ user folder in Windows. Each user on the system would have a separate directory within this sub-directory.
6. /lib: The system libraries required for the proper functioning of installed software are present in this Linux directory. Library in context of computing is define as a reusable resource that can be used by more then one software.
7. /lost+found: This contains the lost and found files of your / directory.
8. /media:This directory is not a part of the Linux directory structure. It is the system directory file which help to recognize all the mounted removable media such as CD, external hard drives, USB drives, cameras etc.
9. /mnt: This Linux directory is used to create mount point for other systems which are attached to the computer on boot, e.g. Windows partitions.
10. /opt: This directory provides a location for optional applications to be installed.
11. /proc: This virtual directory does not consume any space on disk but exists only in the system memory. This directory is freely available for browsing only to the root user.
12. root: This is commonly known as the slash-root directory, it refer to / as root in Ubuntu Linux.
13. /sbin: This directory is also available to root user. It contains commands to change system wide settings.
14. /srv: This directory acts as a temporary location for data meant to be used by servers.
15. /sys: This directory contains system-specific information meant as reference for other applications.
16. /tmp: As the mane suggest, it acts as storage for temporary files.
17. /usr: This is where most of your applications and files will be stored, as anything present here is available for all users to acccess. It can be also be called as the program files folder for Linux.
18. /var: This is a directory for variable files such as logs and databases. Notice the contrast with the /tmp directory.
Sunday, May 7, 2017
Display amount of free and used memory in the system In Ubuntu
Display amount of free and used memory in the system In Ubuntu
By using free you can display amount of free and used memory in the system.
Free displays the total amount of free and used physical and swap memory in the system, as well as the buffers used by the kernel. The shared memory
column should be ignored; it is obsolete.
Example:
free -m
Will display something like this:
 total used free shared buffers cached
Mem: 244 240 3 0 15 82
-/+ buffers/cache: 143 101
Swap: 715 107 608
Usage:
free [-b | -k | -m | -g] [-o] [-s delay ] [-t] [-V]
Options:
The -b switch displays the amount of memory in bytes; the -k switch
(set by default)
displays it in kilobytes; the -m switch displays it in megabytes;
the -g switch displays it in gigabytes.
The -t switch displays a line containing the totals.
The -o switch disables the display of a "buffer adjusted" line. If the
-o option is not
specified, free subtracts buffer memory from the used memory and
adds it to the free memory reported.
The -s switch activates continuous polling delay seconds apart. You may
actually specify
any floating point number for delay, usleep(3) is used for
microsecond resolution delay times.
The -V displays version information.
Tuesday, April 18, 2017
Disable System Beep Sound in Ubuntu
Disable System Beep Sound in Ubuntu
To temporarly disable system beep for current session use following command.
sudo rmmod pcspkr
To perminently disable system beep add following line to /etc/modprobe.d/blacklist file.
blacklist pcspkr
Monday, April 10, 2017
Digital speech in Ubuntu 10 10 maverick
Digital speech in Ubuntu 10 10 maverick
You can make your ubuntu terminal speak to to using spd
Open up a terminal window and type this command:
$ spd-say test
Your computer will then say �test�.
If you want to make your computer speak in complete sentences as below.
$ spd-say � hello how do you do ?"
You can even feed system variables into the spd-say command. For instance, to get spd-say to speak your current working directory:
$ spd-say $PWD
man spd-say for more details
Friday, April 7, 2017
Displaying Trash Computer Home and Network icon on Ubuntu Desktop
Displaying Trash Computer Home and Network icon on Ubuntu Desktop
gconf-editor
First open the terminal window from (Applications -> Accessories -> Terminal ) and type in the following command to launch gconf-editor :
gconf-editor
You will get a window like this :
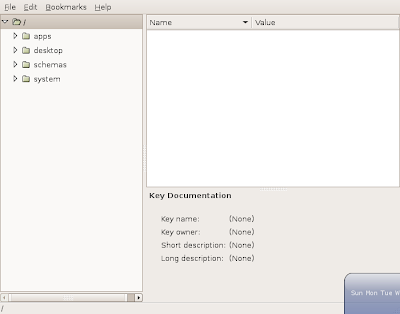
Now on the left side of the Pane in the window expand apps , inside apps expand nautilus and chose desktop (apps -> nautilus -> desktop )you will get a window like this :
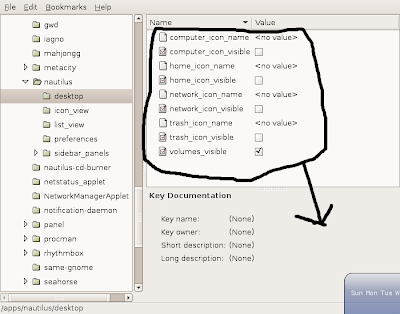 In this window enable "computer_icon_visible" , "home_icon_visible" , "network_icon_visible" and "trash_icon_visible" your window should look like this :
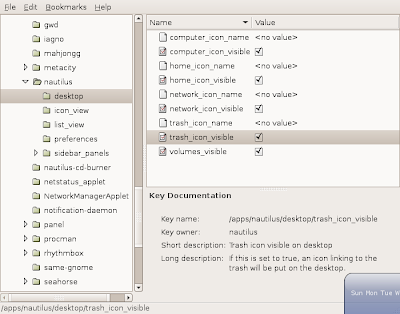
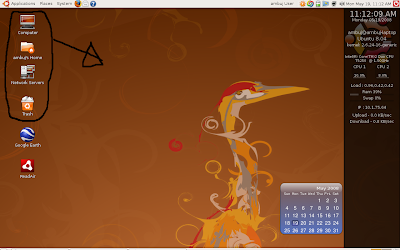 This is how my desktop looks , see the four icons on the top left of the screen :)
For Desktop on Linux Blog , http://linuxondesktop.blogspot.com
(C) 2008 , Ambuj Varshney
Subscribe to:
Posts (Atom)