Showing posts with label displaying. Show all posts
Showing posts with label displaying. Show all posts
Monday, July 10, 2017
Displaying a Word or String in an 16x2 LCD with PIC16F877A and MPLAB X
Displaying a Word or String in an 16x2 LCD with PIC16F877A and MPLAB X
We have seen how to interface an LCD with PIC16F877A . In this we are printing only a letter in the LCD , now we are going to Display a string on the LCD for this following steps are followed

First Create a MPLAB X project as in the steps for Blinking a LED using MPLAB X , PIC16F877A
And check the Interfacing LCD with PIC16F877A in MPLAB X to know how to interface a LCD
Components
1.PIC16F877A micro controller
2. 2x16 LCD Display
we are using the following functions
To display the string in LCD , just call the below lines in main function
The functions are defined below
First Create a MPLAB X project as in the steps for Blinking a LED using MPLAB X , PIC16F877A
And check the Interfacing LCD with PIC16F877A in MPLAB X to know how to interface a LCD
Components
1.PIC16F877A micro controller
2. 2x16 LCD Display
we are using the following functions
- void delay(unsigned int msec) // Time delay function
- void lcd_cmd(unsigned char item) // Function to send command to LCD
- void lcd_data(unsigned char item) // Function to send data to LCD
- void lcd_data_string(unsigned char *str) // Function to send data to string
- void lcd(unsigned char str[10])
To display the string in LCD , just call the below lines in main function
 lcd_cmd(0x01);
  lcd_cmd(0x86);
  lcd("STRING TO DISPLAY");
The functions are defined below
void delay(unsigned int msec) // Time delay function
{
int i,j ;
for(i=0;i<msec;i++)
 for(j=0;j<1275;j++);
}
void lcd_cmd(unsigned char item) // Function to send command to LCD
{
dataport = item;
rs= 0;
rw=0;
en=1;
delay(1);
en=0;
return;
}void lcd_data(unsigned char item) // Function to send data to LCD
{
dataport = item;
rs= 1;
rw=0;
en=1;
delay(1);
en=0;
return;
}void lcd_data_string(unsigned char *str) // Function to send data to string
{
int i=0;
while(str[i]!=)
{
lcd_data(str[i]);
i++;
//delay(10);
}
return;
}void lcd(unsigned char str[10])
{
lcd_cmd(0x38);
lcd_cmd(0x0e);
lcd_data_string(str);
}Friday, July 7, 2017
Displaying Bell Schedule info on admin and teachers pages header of PowerSchool
Displaying Bell Schedule info on admin and teachers pages header of PowerSchool
Its quite useful displaying the bell schedule info of the day on the admin and teachers pagess header in PowerSchool. Here is how to do it:
1. Go to PS Administrator >> Custom Pages
2. Add this following code to wildcards/admin_header_css.txt and wildcards/teacher_header_css.txt
<span id="ssis-date" style="padding-right:20px;">
~[tlist_sql; select b.name as name, listagg(p.ABBREVIATION || ,) WITHIN GROUP ( ORDER BY bi.START_TIME) AS periods
from ps.calendar_day c inner join ps.BELL_SCHEDULE b on c.BELL_SCHEDULE_ID = b.ID
inner join ps.BELL_SCHEDULE_ITEMS bi on bi.BELL_SCHEDULE_ID = b.ID
inner join ps.PERIOD p on p.ID = bi.PERIOD_ID
where TO_CHAR(c.DATE_VALUE, DD-MM-YYYY) = TO_CHAR(CURRENT_DATE, DD-MM-YYYY)
and c.SCHOOLID = ~(curschoolid)
group by b.name; ]
<span style="color:#195f7d">~(name):</span> ~(periods)
[/tlist_sql]
</span>
Requirement: you have to setup the calendar for the day with a bellschedule (https://your.ps.addr/admin/schoolsetup/calendarsetup/calendarsetup.html)
Sunday, June 25, 2017
Displaying sorted list size wise of Files Folder on Linux
Displaying sorted list size wise of Files Folder on Linux
The command I am discussing below helps you solve precisely this problem by giving you an ordered list (ordered in terms of size) of files and folders taking up space in your computer thus helping you find files/folder which are taking up significant amount of space :
du -sm *
Above command would display all the files and folder as well as their size as a list, however this is not a ordered list . To order the list we would need to pipe (that is send output of this command to another ) the output of the "du" command to "sort" command giving out list of files and folders sorted in ascending order according to the size.
du -sm * | sort -nr
Still there is a problem this is an entire list of files and folder in your file system , so if you have number of files and folders it will take number of screens to display . A better way would be to pipe the output of above command to "head" command to display only specified number of lines of output generated by "du -sm * | sort -nr " command .
du -sm *| sort -nr | head -15Now the above command would display the top 15 files and folder according to their size .
For Desktop on Linux Blog , http://linuxondesktop.blogspot.com
(C) 2008 , Ambuj Varshney
Saturday, May 6, 2017
Displaying Resolution Correctly on WideScreen Laptop
Displaying Resolution Correctly on WideScreen Laptop
Displaying Resolution Correctly on WideScreen Laptop
Recently I made a switch from a IBM based 14� laptop to Compaq 15.1� Widescreen laptop. I had never experienced any type of difficulty in running fedora on my old laptop right up to Fedora Core 5. But Fixing screen Resolution on my WideScreen laptop turned out to be a very tiring effort. I wanted to set my screen resolution to 1280x800 which was the highest resolution that was supported but even after setting numerous times from the Graphical Display tool that came preinstalled I was unable to change the resolution it always reverted back to 1024x768 resolution . I tried changing the /etc/X11/xorg.conf file manually but even this did not work so after quiet a bit of googling around I found a solution to my problem and here it is.
First i changed the Display to a Generic LCD Panel 1280x800 after changing this is what my xorg.conf file looked like
# Xorg configuration created by system-config-display
Section "ServerLayout"
Identifier "single head configuration"
Screen 0 "Screen0" 0 0
InputDevice "Keyboard0" "CoreKeyboard"
InputDevice "Synaptics" "CorePointer"
EndSection
Section "InputDevice"
Identifier "Keyboard0"
Driver "kbd"
Option "XkbModel" "pc105"
Option "XkbLayout" "us"
EndSection
Section "InputDevice"
Identifier "Synaptics"
Driver "synaptics"
Option "Device" "/dev/input/mice"
Option "Protocol" "auto-dev"
Option "Emulate3Buttons" "yes"
EndSection
Section "Monitor"
### Comment all HorizSync and VertSync values to use DDC:
### Comment all HorizSync and VertSync values to use DDC:
### Comment all HorizSync and VertSync values to use DDC:
### Comment all HorizSync and VertSync values to use DDC:
### Comment all HorizSync and VertSync values to use DDC:
### Comment all HorizSync and VertSync values to use DDC:
### Comment all HorizSync and VertSync values to use DDC:
### Comment all HorizSync and VertSync values to use DDC:
### Comment all HorizSync and VertSync values to use DDC:
### Comment all HorizSync and VertSync values to use DDC:
### Comment all HorizSync and VertSync values to use DDC:
### Comment all HorizSync and VertSync values to use DDC:
### Comment all HorizSync and VertSync values to use DDC:
### Comment all HorizSync and VertSync values to use DDC:
### Comment all HorizSync and VertSync values to use DDC:
### Comment all HorizSync and VertSync values to use DDC:
Identifier "Monitor0"
ModelName "LCD Panel 1280x800"
### Comment all HorizSync and VertSync values to use DDC:
HorizSync 31.5 - 67.0
VertRefresh 50.0 - 75.0
Option "dpms"
EndSection
Section "Device"
Identifier "Videocard0"
Driver "i810"
EndSection
Section "Screen"
Identifier "Screen0"
Device "Videocard0"
Monitor "Monitor0"
DefaultDepth 24
SubSection "Display"
Viewport 0 0
Depth 24
Modes "1280x800" "1152x864" "1152x768" "1024x768" "800x600" "640x480"
EndSubSection
EndSection
Then the main part I downloaded a tool called 915resolution that modifies the Video Bios of 800 and 900 series intel video-chipsets making temporary changes to include a number of video modes not supported
Here is the link to 915resolution tool :- http://www.geocities.com/stomljen/915resolution-0.5.2.tar.gz
After downloading it I extracted the tool into the /usr/bin directory after becoming the superuser though it can be extracted to any other directory you wish.
First I Displayed a list of available video modes :-
915resolution �l
There was no 1280x800 mode in the list hence I had to insert it .
So what I did was issue command
915resolution 38 1280 800 24
here 38 is the mode number i want to override 24 is the color bits I want. An important thing to note here is that this change is temporary hence will be forgotten by computer once computer is switched off/ Restarted hence I add the following command to /etc/rc.local
/usr/bin/915resolution 38 1280 800 24
This is how my /etc/rc.local file looked like
#!/bin/sh
#
# This script will be executed *after* all the other init scripts.
# You can put your own initialization stuff in here if you dont
# want to do the full Sys V style init stuff.
touch /var/lock/subsys/local
/usr/bin/915resolution 38 1280 800 24
and restarted the computer and voila I was thrown into my new 1280x800 video mode .
Friday, April 7, 2017
Displaying Trash Computer Home and Network icon on Ubuntu Desktop
Displaying Trash Computer Home and Network icon on Ubuntu Desktop
gconf-editor
First open the terminal window from (Applications -> Accessories -> Terminal ) and type in the following command to launch gconf-editor :
gconf-editor
You will get a window like this :
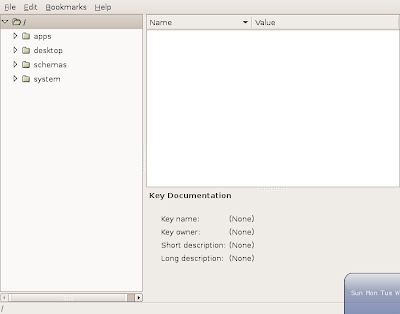
Now on the left side of the Pane in the window expand apps , inside apps expand nautilus and chose desktop (apps -> nautilus -> desktop )you will get a window like this :
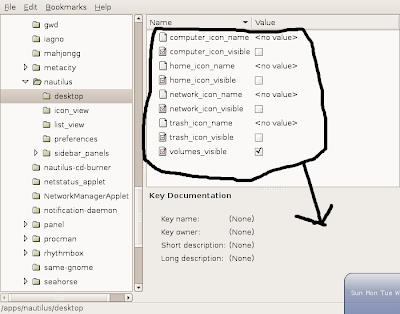 In this window enable "computer_icon_visible" , "home_icon_visible" , "network_icon_visible" and "trash_icon_visible" your window should look like this :
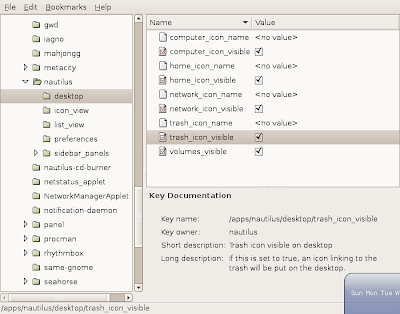
For Desktop on Linux Blog , http://linuxondesktop.blogspot.com
(C) 2008 , Ambuj Varshney
Subscribe to:
Posts (Atom)