
Pages

Showing posts with label windows. Show all posts

Monday, July 24, 2017

Disable and Turn Off Windows XP Login Screen and Show Traditional NT Log On to Windows Box

Disable and Turn Off Windows XP Login Screen and Show Traditional NT Log On to Windows Box


When Windows XP boots up in multiple users system, by default on startup, Windows XP will display a graphical logon screen with user icons and user names. In this �Welcome Screen�, user can click on his or her username or icon, type in the password (if assigned) and then log on to Windows XP desktop. Some XP may find theWelcome Screen is a beautiful user interface and convenient feature to quickly log in to WindowsXP without tying additional long user name.

However, at times, Windows XP users may need to use the more traditional and standard �Log on To Windows� dialog box inherited from WindowsNT login screen that allows users to key in user name and password. For example, when want to log on to hidden user account such as Administrator account.


To immediately access and open Log On to Windows traditional and standard login dialog box while on XP Welcome Screen, user can press Ctrl-Alt-Del key sequence twice (same with key sequence for reboot or secure login in NT based Windows). After pressing Ctrl-Alt-Del keys simultaneously twice, Welcome Screen will be changed to logon dialog box with user name and password fields.
To permanently switch to �Log On to Windows� NT styled logon dialog box so that users log on to the computer without using the Welcome screen, instead of using the graphical Welcome login screen, follow these steps:
  1. Log on to Windows XP as Administrator or user with administrative privileges.
  2. Open User Accounts in Control Panel by clicking Start, click Control Panel, and then click User Accounts.
  3. Click Change the way users log on or off.


4. Clear the Use the Welcome screen check box.


1. Click Apply Options button.

Note that by turning off and disabing Welcome screen, Fast User Switching feature is no longer available. To revert and switch back to use Welcome screen in XP, simply tick again the �Use the Welcome Screen� check box so that it is checked.

Read more »

Tuesday, July 18, 2017

Disable popup warnings in Windows XP

Disable popup warnings in Windows XP


Windows XP may be one of the more stable and developed operating systems (Vista is like a beta right now). But there are many irritating aspects in Windows XP.

Windows has a really stupid popup system, which pops up for every unnecessary thing imaginable. For example, there is a popup to warn that disk space is low on the system drive (usually C:). Also, there is a popup for alerting you that a new program installed. As if you didnt know that youve installed a program!

There is an easy registry hack to get rid of all these popups. Do not be appalled by a registry edit - this is really simple.

Open up the registry editor - go to Run, type regedit and click OK. Backing up the registry before a hack is always a good idea, so click File > Export, choose a location and click save. Then, proceed to HKEY_CURRENT_USERSoftwareMicrosoftWindowsCurrentVersionExplorerAdvanced

Right click on the right-hand pane, make New> DWORD Value and name it EnableBallonTips. Set the value to 0 to disable ballontips, and set it back to 1 to enable balloontips.

This hack disables most balloontips. In order to eliminate all popups, some more work is required. In each of the following locations, change the values to 0 to disable balloontips.

Location: HKEY_CURRENT_USERSoftwareMicrosoftWindowsCurrentVersionExplorerAdvanced

1. Change the value of FolderContentsInfoTip to 0

Location: HKEY_CURRENT_USERSoftwareMicrosoftWindowsCurrentVersionExplorerAdvanced

1. Change the value of ShowInfoTip to 0.

Location: HKEY_CURRENT_USERSoftwareMicrosoftWindowsCurrentVersionExplorer ipsShow

1. Change the value of Show to 0

If anything goes wrong, restore the registry file that you had explored before and settings will be restored.
Read more »

Saturday, July 8, 2017

Disabling Windows 10 Update Uploading

Disabling Windows 10 Update Uploading


In a move that has a lot of users up in arms, Microsoft has changed the way that updates are delivered in Windows 10. The new Windows update system uses a torrent like function of using PCs that have already downloaded an update, to share it back onto the internet. This is fine for users with unmetered internet, but for a lot of users, these uploads churn through their data caps quite fast.


Here is how to disable that feature:

Step 1:


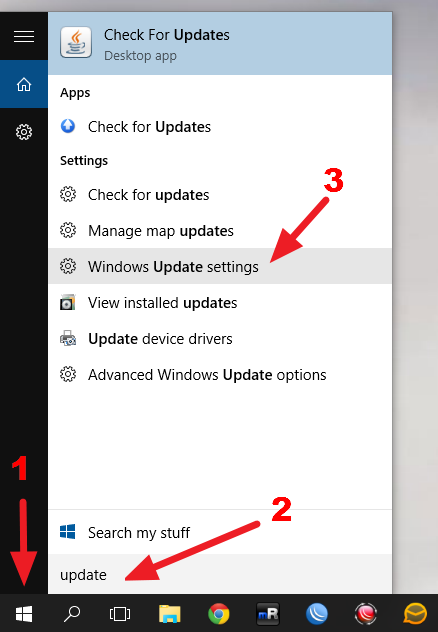
  1. Click on the Start Menu
  2. In the search bar, type "update"
  3. Select "Windows Update Settings"


Step 2


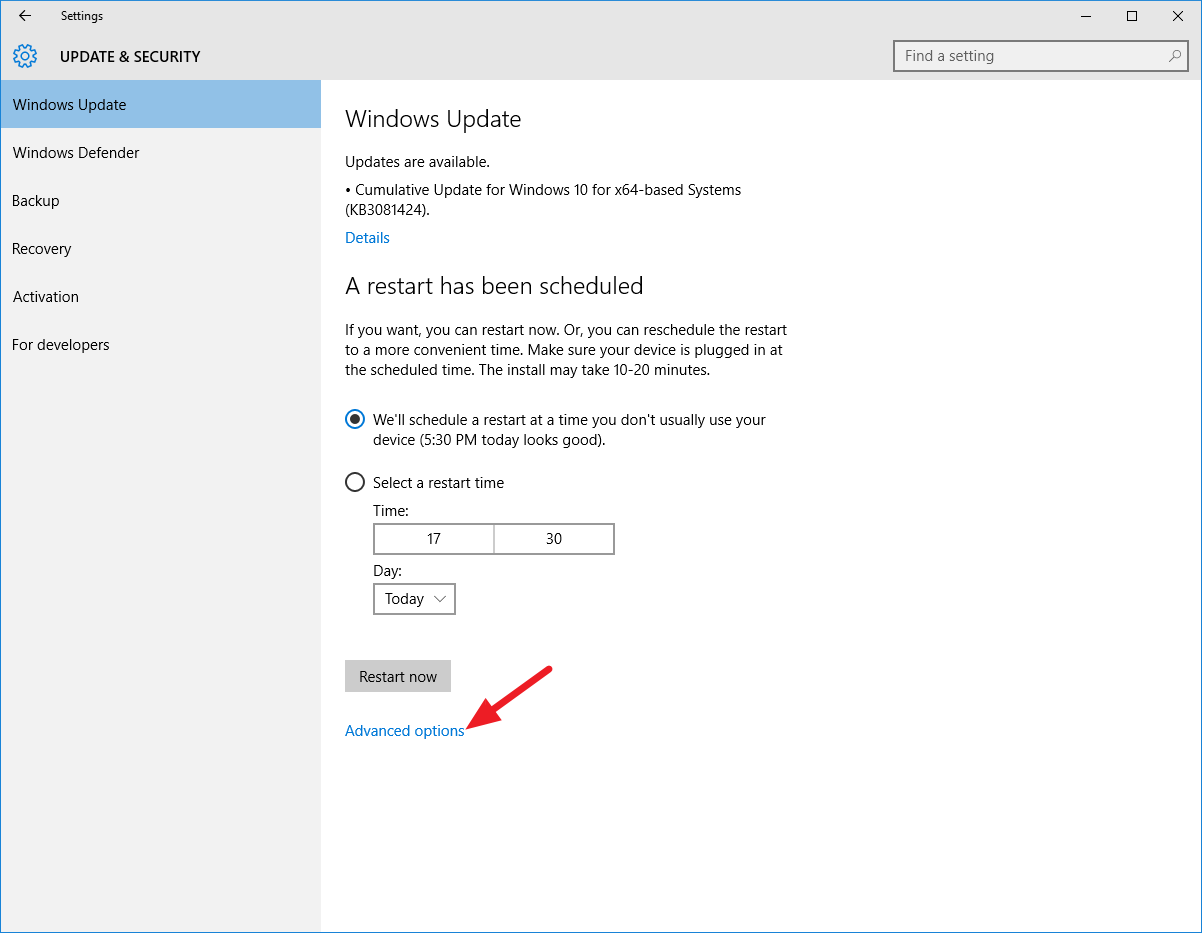
  1.  Click on the option that reads "Advanced Options"


Step 3

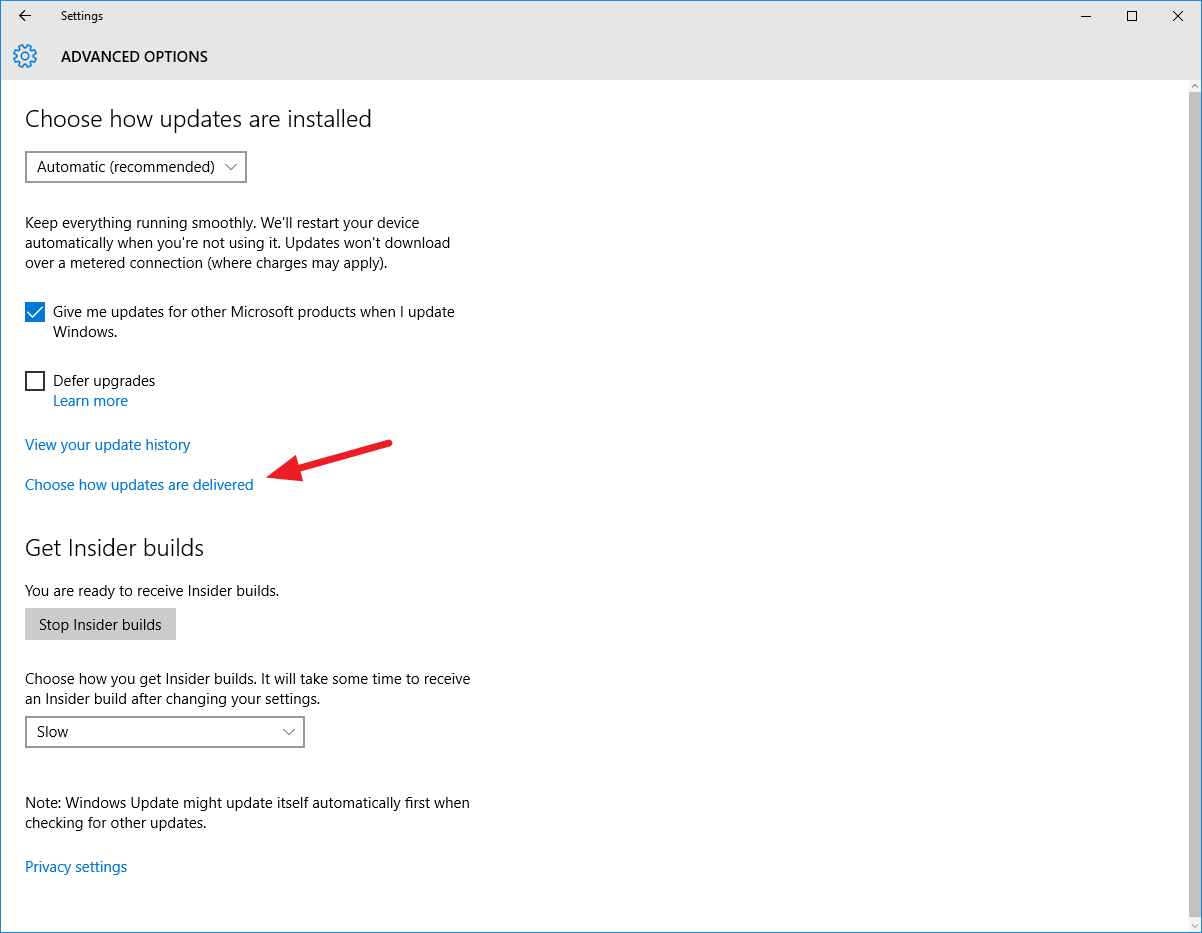
  1. Click on "Choose how updates are delivered"


Step 4

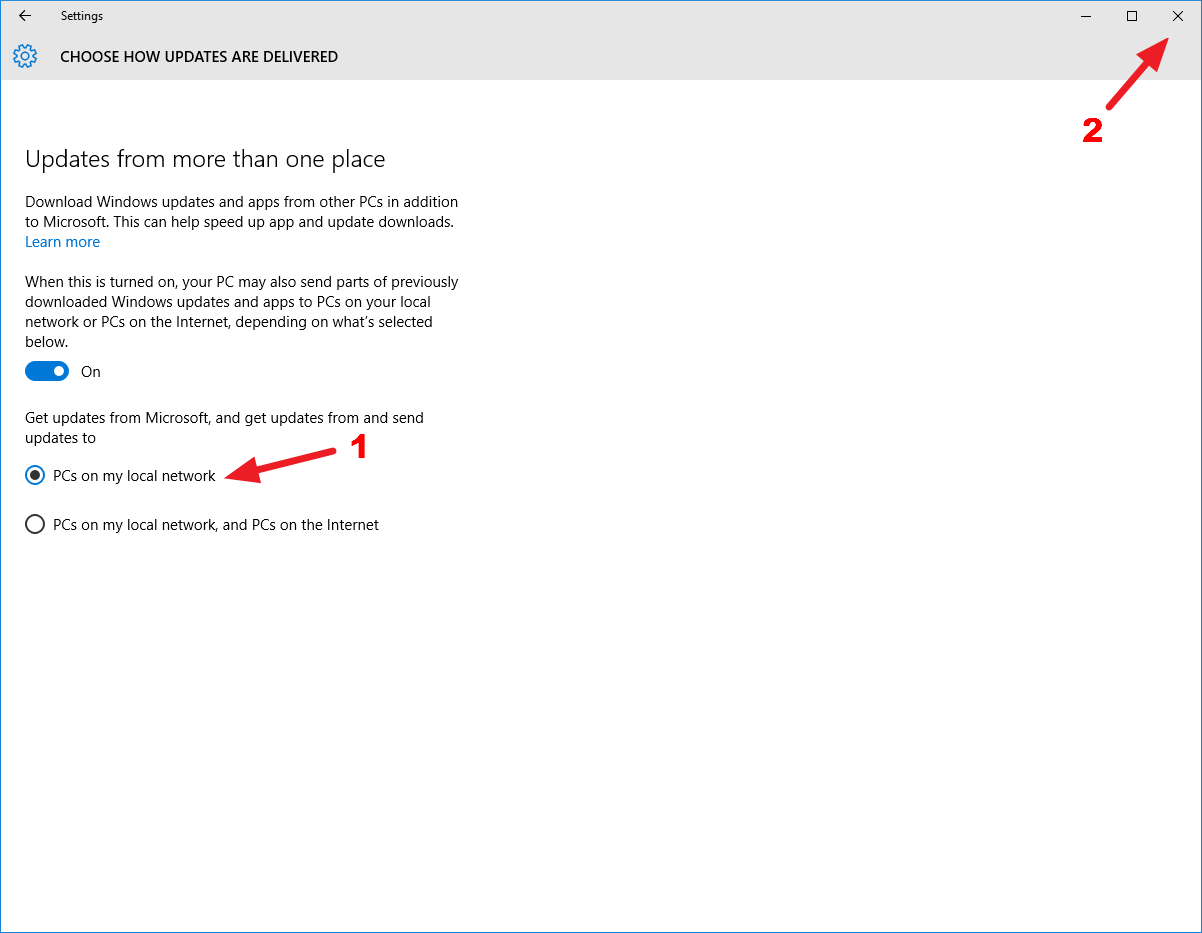
Read the information to get an understanding of the options. My recommendation is that you set up the computer to send updates to PCs on the local network. This will actually save you some bandwidth if you have multiple computers running Windows 10 on your local network.

  1. Select the option that works for you (or turn of update sharing all together).
  2. Close the update settings window to apply changes.

Read more »

Monday, June 12, 2017

Disabling password complexity rule in Active Directory Windows Server2008

Disabling password complexity rule in Active Directory Windows Server2008


If you want to disable password complexity policy in Active Directory Windows Server 2008, you have to do it using Group Policy:

1. Open Group Policy Management Console (Start > Run > gpmc.msc).

2. Open the Domain, and right-click and Edit the "Default Domain Policy".

3. Go into the "Computer Configuration" > "Windows Settings" > "Security Settings" > "Account Policies", and modify the "Password must meet complexity requirements" setting.

4. Start > Run > gpupdate /force to force update the group policy.

Now you can change the users password to whatever you want.
Read more »

Saturday, June 10, 2017

DG D G Unlocker Tools Download Free For Windows 2017

DG D G Unlocker Tools Download Free For Windows 2017


Here we have shared latest setup of D&G unlocker tool absolutely free and download links are available for download. DG Unlocker Tools For Best FRP And Bypass Free Unlock Tools 2016 This incredible device programming helps you to expel FRP bolt from Samsung, Motorola, Huawei, HTC, Lenovo, XIAOMI, and YUPHORIA. You can coordinate download G&G unlocker apparatuses full Free setup installer for windows OS from here. It is totally allowed to download and simple thus basic for utilize. In the event that you need to reset your android advanced mobile phone or tablet, Then don�t squander you time, take after the download catch to download it now. You can use it for unlocking different phones. However it is very easy and simple to use.

Now you can download latest setup of D&G unlocker from below download links. The download links are absolutely free and scanned by viruses. If you are facing trouble during download or downloading links are not working, please contact us via commenting. We will update download links are help you very soon.
Download links
D&G Unlocker Download Free
Read more »

Saturday, May 20, 2017

Disable Windows Defender on Windows 8 1

Disable Windows Defender on Windows 8 1


Yeah, it�s been a while since my last post... Many thing have happened, many more will, but that�s irrelevant, lets focus on today�s post. LETS DISABLE THIS:

Windows Defender

Windows 8.1 has a pretty good security because it has it�s own AV within the OS, but I don�t like it and many people don�t either. Here�s how to disable it.

Go to the Control Panel > Windows Defender.

Windows Defender

Now go to Settings > Administrator > Uncheck Turn off this app.

Windows Defender

That�s it, now I will explain how to reactivate it in the next post.

Read more »

Friday, May 12, 2017

Digital Persona for Windows 7 64 bits

Digital Persona for Windows 7 64 bits


Many of us have had troubles trying to install correctly a fingerprint reader on a computer. Ill show you all how easy it is and it WILL work fine! Even with Firefox!

1) First UNINSTALL all software and DDK (validity drivers)....

Make sure you also go to Control Panel => Device Manager => Validity Sensor

UNINSTALL the sensor and check "delete the driver software for this device"


2) Then make sure you REBOOT


3) Download and Install Validity drivers from HP

1-sp48509.exe


4) REBOOT AGAIN ... it is important


5) Download Digital Persona ver 4.11.3805 from link below

http://d11tvxmfjhi64o.cloudfront.net/X64/Setup.exe


6) RUN the Setup.exe

When it asks to install driver for finger print reader (the first dialog you get when you run the setup.exe)

DO NOT click INSTALL

Leave the installation window as it is...


7) Open windows explorer by pressing win+E


8) Go to


C:UsersUsername AppDataLocalTemp

click the column "Date Modified" to sort the last modified files first in the list

You will have a folder with {05B54AFA-28C6-4FED-A0E6-3F235641DA1D } <==== EXAMPLE only it will be different on your computer

Go in the folder and you will see some ini files with a file named "fingerprint reader drivers.prq"

open "fingerprint reader drivers.prq" in notepad.exe

Delete all the lines of text in the file "fingerprint reader drivers.prq" and save the empty file.


9) return to Digital Persona setup dialog mentioned in point 6

Now click INSTALL and let it install the software

It will open the same folder again and then continue install...

When it asks to REBOOT click YES


10) After REBOOT the finger print reader is working without a hitch.
Read more »

Thursday, May 11, 2017

DirectX 10 fix 3 para Windows xp

DirectX 10 fix 3 para Windows xp


ReiDoDownload.BlogSpot.com


Vers�o nova do directx 10 pro Windows xp.

Tamanho:
6,49 Mb


Download [EasyShare]
Read more »

Sunday, May 7, 2017

Disable USB storage in Windows XP Vista 7

Disable USB storage in Windows XP Vista 7


disable usb

Sometime we need to disable or stop the USB port of our computer. Here are the tips of how you can do this using Windows Registry.


1. Open the Notepad, copy and paste the settings below:
Windows Registry Editor Version 5.00
[HKEY_LOCAL_MACHINESYSTEMCurrentControlSetControlStorageDevicePolicies]
"WriteProtect"=dword:00000001
2. Open the File menu->Save As and Select "All Files (*.*)" from Save as type options. Input any file name with ".reg" extension, example "DisableWrite2USB.reg"
3. To Disable, just double click the file, click "Continue", if UAC is enabled and choose "Yes" for the confirmation.
To enable writing to usb storage, change first the value to zero and repeat the procedure above.
"WriteProtect"=dword:00000000

Disable plugging of USB storage such as flash drives/USB hardisks  in Windows Vista/Xp
1. Open the Notepad, copy and paste the settings below:
Windows Registry Editor Version 5.00
[HKEY_LOCAL_MACHINESYSTEMCurrentControlSetServicesUSBSTOR]
"Start"=dword:00000004
2. Open the File menu->Save As and Select "All Files (*.*)" from Save as type options. Input any file name with ".reg" extension, example "DisableUSB.reg"
3. To Disable, just double click the file, click "Continue", if UAC is enabled and choose "Yes" for the confirmation.
To enable usb storage, change first the value to 3 and repeat the procedure above.
"Start"=dword:00000003
Note: Dont forget to restart your computer afterwards.
Read more »

Disable Windows Defender on Windows 10

Disable Windows Defender on Windows 10


I know, I know, disabling your antivirus can cause security issues and stuff. Well, I don�t care, let�s disable it.

Open the Group Policy Editor, aka, gpedit.msc.

Win+ANY KEY is my favorite shortcut.

Feel free to touch anything you want in there; there are pretty clear descriptions on each element, so if you mess your PC, that�s on you.

We need to go the following folder:

Computer configuration > Administrative templates > Windows Components

No text.

In there search for the Windows Defender folder. In there you�ll find a policy setting named Turn off Windows Defender. Double click it. Set it to Enabled.

Do I really need to tell you the steps?

That�s it. You don�t even need to restart your pc or anything. Good bye, Windows Defender.

Read more »

Saturday, May 6, 2017

Digital certificates windows XP location

Digital certificates windows XP location


Microsoft Windows XP - Manage certificates for a computer
Read more »

Tuesday, May 2, 2017

Device Cleanup Tool Remove all non present devices from Windows PC

Device Cleanup Tool Remove all non present devices from Windows PC


Device Cleanup Tool is a free portable tool that lets you remove multiple or all old, non-present, unused, previous hardware devices from your Windows computer. Non-present devices are those devices that were once installed, but are now no longer attached to the computer. When you use the built-in Windows Device Manager, you can delete the devices one-by-one; and not all at once. This is what�s possible with this Device Cleanup Tool. You can select one, multiple or all non-present devices and delete them together.

Remove all non present devices
Using the Device Cleanup Tool is very easy. Simply download the zip-file from the Uwe Sieber website. Upon extracting the zip folder, you will see two versions of the Device Cleanup Tool; one for 32-bit and another for 64-bit PCs. Double-click on the .exe file that is suitable for your system.
The tool immediately lists down the non-present devices in your PC. You will see the device name, its class and number of days from the day when the device was last used. You can see in the image last used days such as 36 days, 59 days etc.
As mentioned in the tool�s Help file, all those devices listed by the Device Cleanup tool are currently �not present�. That means, usually they have the problem code 45 which is CM_PROB_PHANTOM, �The device currently exists only in the registry�. And the �last used� time comes from the write time of the device�s registry key underHKEY_LOCAL_MACHINESYSTEMCurrentControlSetEnu.
On some Windows PCs, this time is calculated as per the startup, hence the devices on these PCs will have the same age. However, on most Windows, the time is set when the device gets active, hence, for such systems, the �last used� time is relevant.
From the list generated by Device Cleanup tool, you can select one, multiple or all devices and delete them together. In case the device is again attached, it will be detected as a new device, the next time you use the tool.
There are three tabs in the toolbar of the Device Cleanup tool � File,Devices and Help.
When you click on File, you can see functions such as Refresh (F5), Create System Restore Point, Show Windows Device Manager and Exit.
When you click on �Show Windows Device Manager� the built-in Device Manager opens up. It�s like a shortcut to the Windows device manager. The non-PnP devices and �soft� devices are not listed in by the Device Cleanup tool. That�s because they cannot be automatically reinstalled. Hence, in order to delete them, you need to use the Windows Device Manager.
The creators of this tool also warn that you be careful with the Microsoft MEDIA class devices. Make sure that you know what to do with such listed devices before you delete them.
The Devices tab lets you Select all devices and Remove selected devices. To delete single devices, simply right-click on the device and click on Remove Device. Remember, you will have to have administrator rights for removing the devices, otherwise you may get an �Access Denied� error.
The Help tab, just give details about the tool, including its version number.
Device Cleanup Tool free download
You can download the tool from this web page.
Read more »

Saturday, April 22, 2017

Disable Security Center notification in Windows 10

Disable Security Center notification in Windows 10


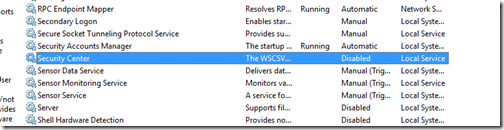
If you like customizing Win10 just like me, the first thing you did was disable the Security center service, like this.

These are my services.

Then you noticed an annoying notification poping up each time you start Windows (I don�t have an image showing it). And when I say annoying, I mean it. So, let�s disable it.

Download this little .reg file and double click it. What this file does is gives you like a �super user� privilege on the files you choose. Now, what to do?

Go to C:WindowsSystem32, find these two file:

ActionCenter.dll

ActionCenterCPL.dll

Use the �Take Ownership� on each of those, and modify the name.

I already did it, and I wont restart my pc just to show you.

I never recommend deleting the files or changing the name to something hard to remember. Just add an �.old� at the end, or do like me and add a �--� at the beginning.

And that�s it, restart you pc.

Read more »

Thursday, April 20, 2017

Disable or Change CAPS Lock Key Function In Windows Read more Disable or Change CAPS Lock Key Function In Windows

Disable or Change CAPS Lock Key Function In Windows Read more Disable or Change CAPS Lock Key Function In Windows


Its quite frustrating when you are completing some important document and accidently the caps key is pressed again and again which disturbs the momentum of work. Actually as per a survey CAPS lock key is the most hated key on a qwerty keyboard.

caps-lock-key

Even I used to have this problem of caps lock turning on accidently many times on my old keyboard. However if you have any kind of problem related to caps lock key on your keyboard we have multiple solution for regarding the caps lock key.

These are some of the registry tweaks you can apply to change the caps lock key behaviour, if you are geeky then go for the registry tweaks or else go for the recommended free applications to solve this problem.

Registry Tweaks To Disable or Change CAPS lock Key Function

1. Convert your Caps lock key behaviour into shift key convert-caps-lock-to-shift.reg

2. Swap the functionality in between the caps lock key and the control key swap-caps-lock-with-control-key.reg

3. Change Caps Lock into a Control key: caps_lock_to_control.reg

4. Disable Caps lock key completely in windows disable-caps-lock-key.reg

Uninstall these Registry

Remove Scancode Mapping and revert the caps lock functionality by this registry key revert-caps-lock-functionality.reg

Note: Improper registry editing on your own can cause serious problem for you in windows, so if you are not comfortable editing your registry, then some of the free applications mentioned below can help in your case to get rid of the caps lock key on your keyboard.

1. Free Caps Lock Changer � This small utility can change the caps lock to underscore, +, =, , ?, ctrl, shift, alt,space etc

capslock_key-chnager-1

Download Caps Lock Key Changer

2. Caps Lock � This small utility will play a notification sound when ever caps lock or num lock key in ON

capslock-sound

Download Caps Lock

Read more »

Sunday, April 9, 2017

DirectX 10 para Windows XP

DirectX 10 para Windows XP


DirectX 10 - by DeskWin Ajuda
Para quem ainda n�o sabe, a algum tempinho atr�s a Microsoft lan�ou o DirectX 10, programa este que melhora a qualidade dos gr�ficos de seus jogos, etc� Mas a Microsoft havia lan�ado exclusivamente para usu�rios do Windows Vista, mas recentemente disponibilizaram a vers�o para o Windows XP tamb�m. Vale a pena fazer o download.

Leiam a Mat�ria Completa�
Read more »

Monday, April 7, 2014

Panasonic BizPad Windows CE Tablet Review Price and Specification


Panasonic released BizTab Windows CE Tablet (Model: JT-H380VT). Panasonic BizPad tablet is dustproof, shockproof and waterproof which measures 190 mm x 163 mm x 23 mm and weighs 600 grams. Panasonic BizPad featured 6.5-inch touch screen display with LED backlight, 32bit RISC CPU 400MHz Freescale i.MX27L, 256 MB DDR RAM, 512 MB ROM, SD / SDHC, 1.3 megapixel camera and front facing camera 2 megapixel camera with LED back-lightning.

Other features include Bluetooth 2.0, IrDA, Wi-Fi, 3G (CDMA NTT DoCoMo FOMA or KDDI AU), IC-card reader and optional Microsoft Windows Embedded CE 6.0 operating system R3.  BizTab is already available on the Japanese market now, NTT DoCoMo and KDDI AU, the carriers argue that the tablet FOMA or CDMA broadband. Pricing details and releasing details has not yet revealed.

Panasonic BizPad Tablet Specification


  • 6.5 inches of touchscreen display with a LED backlight
  • 640 x 480 pixel of screen resolution
  • 256MB DDR RAM
  • 512MB of ROM
  • 400Mhz Freescale i.MX27L 32bit RISC processor
  • Runs on Windows CE 6.0 R3 operating system
  • Bluetooth 2.0, IrDA, Wi-Fi, 3G (NTT Docomo FOMA or CDMA AU by KDDI) connectivity
  • 2 mega pixel of rear camera with LED flash
  • Optional IC card reader
  • Dust proof, shockproof and waterproof
  • 190 x 163 x 23 mm of dimension
  • 600 grams of weight


Read more »